
Vinyl Plotters for Clean Custom Signs and Decals
Vinyl plotters are one of the most useful tools in professional sign making. Here is how they work, where they fit into San Jose storefront and fleet projects, and what it takes to get clean, durable results.
Key takeaways
- A vinyl plotter is a computer-controlled cutter that turns vector artwork into precise lettering, decals, and graphics from self-adhesive film.
- The most important settings are blade depth, cutting force, and speed. Clean cuts depend on matching those settings to the vinyl and the design detail.
- The workflow is design, cut, weed, transfer tape, and apply. Rushing any step can lead to lifted letters, bubbles, or rough edges.
- For San Jose storefronts, vehicles, offices, and event graphics, material choice and installation surface matter as much as the cut itself.
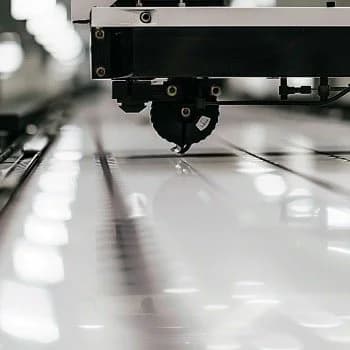
If you have walked past a restaurant on The Alameda, a retail window at Santana Row, or a service van parked outside a jobsite in Sunnyvale and noticed crisp vinyl lettering, there is a good chance a vinyl plotter was part of the process. These machines are everyday workhorses in commercial sign shops, used to produce everything from window decals and vehicle graphics to custom die-cut stickers, office lettering, temporary promotions, and safety signage.
Whether you are learning the production side of sign making or trying to understand what goes into a clean vinyl graphics job, this guide explains how vinyl plotters work, what affects cut quality, and why surface prep and material selection matter for businesses around San Jose, Santa Clara, Palo Alto, Mountain View, Cupertino, Milpitas, and Fremont.
What is a vinyl plotter?
A vinyl plotter, also called a vinyl cutter, is a computer-controlled machine that moves a small blade across a sheet or roll of vinyl to cut shapes, letters, and logos. Instead of printing ink, the machine follows vector paths from design software and cuts the exact outline of the artwork.
For most sign work, the blade cuts through the face film but stops before it cuts through the backing liner. That technique is called kiss cutting. After the cut, the extra vinyl is removed in a process called weeding, leaving only the letters or shapes that will be transferred onto glass, metal, plastic, painted walls, vehicles, or other sign surfaces.
Why use a vinyl plotter for sign making?
Vinyl plotters are popular because they handle a wide range of practical sign jobs without requiring a large fabrication setup. For local businesses, they are especially useful when a project calls for sharp lettering, quick turnarounds, or repeatable graphics across several locations or vehicles.
- Precision: Professional cutters can produce clean edges on letters, logos, arrows, hours of operation, and small compliance labels when the artwork is prepared well.
- Speed: Once a file is set up, cutting is efficient, which helps with decal batches, storefront updates, event graphics, and repeat vehicle markings.
- Versatility: Beyond standard adhesive vinyl, many cutters handle heat transfer vinyl (HTV), thin magnets, cardstock, reflective films, and frosted glass films.
- Material efficiency: Software can nest multiple graphics on a single sheet or roll so less vinyl is wasted.
How do you choose a vinyl cutter?
The right cutter depends on what you plan to make. A hobby machine can be fine for labels and small decals. A commercial sign shop serving storefronts, office interiors, and fleets in a dense market like San Jose usually needs a wider, more accurate, more consistent machine.
- Drive motor type: Servo motors generally run smoother and quieter and are better for small text and detailed cuts. Stepper motors cost less but can struggle with intricate graphics.
- Tracking: Long window bands, vehicle striping, and wall graphics need a cutter that can keep vinyl moving straight over the length of the job.
- Cut width: Desktop cutters around 12 to 15 inches work for small decals. Professional cutters are commonly 24 inches and wider for storefront lettering, vehicle graphics, and larger panels.
- Contour cutting: If you need to cut around printed stickers or labels, an optical registration system helps the machine read marks and follow the printed design accurately.
Popular brands include Roland, Graphtec, GCC, Silhouette for hobby use, and Cricut for craft work. For professional sign production, reliable tracking, clean small-letter cutting, and consistent pressure control usually matter more than headline speed.
How do you set up a cut job?
1. Create or import your design
Use vector software like Adobe Illustrator, CorelDRAW, or the cutter's bundled software. The file needs clean vector paths, not just a flat raster image, because the blade follows outlines. Messy artwork, overlapping shapes, duplicate paths, and tiny disconnected pieces can all create production problems.
- Keep designs simple when possible. Fine details, tiny text, and thin strokes are harder to weed and easier to damage during installation.
- For multi-color graphics, separate each color into its own layer so the pieces can be cut and aligned in order.
2. Load the vinyl
Feed the vinyl into the cutter and align it carefully with the pinch rollers. A crooked load will usually become more obvious as the job runs. Many machines have a pre-feed function that pulls slack from the roll and helps confirm the material will track correctly before the blade starts cutting.
3. Dial in your settings
Three settings matter most, and each one should match the material, blade condition, and level of detail in the design:
- Blade depth: The blade should cut the vinyl face, not dig into the liner. Too shallow and the design will not release. Too deep and the backing can tear or drag.
- Pressure or force: Thicker and specialty films need more force than standard vinyl, but too much force can distort corners and make weeding harder.
- Speed: Slower speeds usually produce cleaner corners and curves, especially on small lettering for doors, windows, and labels.
4. Run a test cut
Before committing to the full job, send a small test shape. It should weed cleanly while leaving the backing liner intact. A quick test is faster than recutting a full panel of store hours, suite numbers, or delivery vehicle graphics.
What is weeding, and how do you do it well?
Weeding is the process of removing the unwanted vinyl around and inside the cut design. A weeding hook or pick tool is used to lift away negative space while the finished letters and graphics stay on the backing liner.
- Work in good light so fine cut lines are visible.
- For detailed logos or small lettering, weed in sections instead of pulling a large sheet at once.
- Use boxes or weed borders around groups of text to control where the vinyl releases.
- If vinyl tears, lifts, or leaves ragged edges, check blade sharpness, blade depth, and cutting force.
How do you transfer and apply vinyl?
After weeding, apply transfer tape, also called application tape, over the design. Smooth it down with a squeegee so the tape grabs the vinyl face. Then peel the tape and vinyl away from the backing liner and position the graphic on the final surface.
- Clean the surface first. Dust, silicone cleaners, oil, and moisture can weaken adhesion.
- Squeegee firmly from the center outward to push out air and help the adhesive make contact.
- Peel transfer tape slowly at a sharp angle so the vinyl stays on the surface.
- For curved vehicle panels or textured areas, use the right conformable vinyl and installation method for that surface.
San Jose and the surrounding South Bay see plenty of sun, heat, rain, dust, and glass exposure. For exterior doors, windows, vehicles, and A-frame inserts, the best result usually comes from matching the vinyl to the location, expected lifespan, cleaning routine, and amount of direct sun. For apparel and fabric, use heat transfer vinyl instead, cut the design mirrored, weed it, and apply it with a heat press or iron.
What materials can a vinyl plotter cut?
Most vinyl cutters handle a practical range of sign and graphics materials:
- Adhesive vinyl: For decals, window graphics, wall lettering, door hours, directional signs, and vehicle graphics.
- Heat transfer vinyl: For shirts, bags, uniforms, and fabric items.
- Specialty vinyl: Reflective, frosted glass, holographic, metallic, and translucent films for different visibility and design needs.
- Thin magnet sheets: For magnetic vehicle signs that can be removed and reapplied.
- Cardstock and paper: For stencils, packaging inserts, and mockups.
Where vinyl plotters fit into local sign projects
Vinyl cutting is not only for small decals. In a sign shop, it can support a full range of commercial projects across San Jose and nearby cities:
- Storefront windows: Hours, logos, privacy bands, seasonal promotions, and tenant names for retail centers and street-facing businesses.
- Office interiors: Conference room names, wall lettering, reception graphics, and frosted privacy film for glass partitions.
- Vehicles: Door logos, DOT numbers, service area lists, QR codes, phone numbers, and simple fleet identification.
- Temporary campaigns: Grand openings, hiring notices, pop-up events, real estate windows, and short-term sale graphics.
- Wayfinding and safety: Directional arrows, room labels, caution labels, and simple facility markings.
For businesses in Palo Alto, Santa Clara, Sunnyvale, Mountain View, Cupertino, Milpitas, and Fremont, the same production principles apply, but the installation site can change the details. A glass storefront in a sunny plaza, a painted interior wall, and a service truck parked outdoors all need different vinyl choices and prep.
Pro tips for better vinyl cutting and installation
- Use registration marks for multi-color jobs: They help align layers when building a logo or graphic from separate vinyl colors.
- Keep your blade sharp: A dull blade creates tearing, incomplete cuts, and extra weeding time.
- Clean your machine: Dust, scraps, and adhesive buildup can affect tracking and blade movement. Wipe rollers and cutting strips regularly.
- Store vinyl properly: Keep rolls upright and away from heat, direct sun, and moisture to reduce curling and adhesive issues.
- Check the install surface: Fresh paint, rough walls, low-energy plastics, dirty glass, and old adhesive residue can all affect the final bond.
- Plan for approvals: For leased spaces, shopping centers, and multi-tenant buildings, coordinate with property managers before producing permanent window or wall graphics.
When to hire a sign shop instead
A vinyl plotter is useful for in-house production if you have the volume, artwork skills, tools, and time to test materials. But for projects that need clean storefront visibility, consistent fleet graphics, contour-cut printed decals, larger installations, or coordination with a landlord or property manager, working with a sign shop can save time and reduce rework.
At San Jo Sign Co, we use professional-grade vinyl cutters alongside printing and fabrication methods to make graphics for storefronts, offices, vehicles, and events in San Jose and the listed Silicon Valley service areas. If you have a project in mind, such as window graphics, decals, banners, vehicle lettering, or interior branding, tell us what you are making and we will help you choose the best production approach.